Schedule a New Job
So a customer calls and wants you to stop by next week, either Wednesday or Friday, to clean the carpets in her home. How do you schedule her?
You can schedule from the WorkWell Command Center if you are on your computer or with the Mobile App if you are in the field. The Command Center offers the most capability and we recommend you do most of your scheduling there. But it is easy to add new jobs from the Mobile App too.
Employees must be authorized with the appropriate privileges to create new jobs. Setting Employee Privileges
Scheduling from the Command Center
View our Scheduling Video on YouTube.The most direct way to create/schedule a job is to just open the 'New Job' form and fill out all the information. How to open a 'New Job' form
 |
| New Job Form |
In the 'When' box, choose the start date and time. The end date and time will be set automatically from the services you select as line items (the services you have set up will have a default duration that you assign). You can click 'Override' to set the end date and time yourself.
 |
| Job Start/End |
 |
| Schedule for This Week - Color-Coded by Worker |
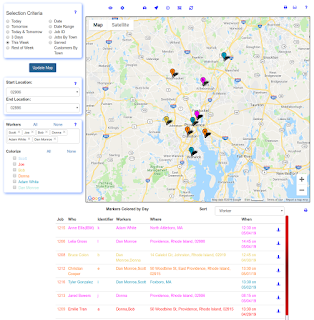
Of course, you also want to include job locations in your scheduling decisions. Ideally, you schedule jobs and assign to available workers based on when a worker is already in the general area that the new job is located in. For this, just open the Map page and take a look at where all the already scheduled jobs are located. Under selection criteria, select a timeframe that covers the days you are considering for the new job - choose 'This Week', for example. Also, choose the workers you want to colorize for. The markers that appear will show you where the jobs are located and will be colored by worker. The table below the map will give you the job details. With this map view, you will be able to see if and when a worker is in the same town as the new job.
 |
| Job Locations - Color-Coded by Worker |
Scheduling from the Mobile App
On the Mobile App, you can view your schedule in a Month or Day view like shown.
 |
| Mobile App Calendar - Month & Day Views |
When you decide the Date & Time for the new job, go to the Job List view and click the + icon in the upper right.
 |
| Job List - Click Plus Icon to Add New Job |
The New Job form will appear - choose the customer, select the job start date, time and duration. Choose the services under Line items. Etc.
 |
| New Job Form - Describe the Job |


No comments:
Post a Comment