Featured Post

Recurring Jobs

Recurring jobs are sequences of jobs automatically generated according to a schedule that you set up. The schedule can define days of the...

Popular Posts

Wednesday, June 26, 2019

Make an Email or Text Template

What is an Email or Text Template?

These are Emails or Texts that you have written for a particular purpose and saved for future use.  Typically you spend a little time on these so they are just as you want them.  For example, you can enter placeholders for the customer name.  You might also have a footer with your company info and logo (for emails, not texts).

View our Video About Email Templates

An example email reminder
An example email list

Making an Email Template

You create your email templates using the WorkWell Command Center email tool.  Templates cannot be created using the Mobile App.

To create your template, open the Email Composer (you can click on an email link - or open a Customer Form or the Customer Table and click on an email link).  This will open the Email Composer.  Then just prepare an email like you normally do.  In the example below, we are writing an email saying simply that we are On Our Way and on time.


Prepare your Template Using the Email Composer

Notice that we have inserted a few Placeholders in the Email (the keywords surrounded by the %% characters, like %%CustomerName%%.  Using these, we make the Email Template very flexible - we don't have to know in advance who the email is intended for, nor do we need to know which worker in your company is sending it or even when it is sent.  This example uses 4 placeholders:

  • CustomerName
  • MyName
  • JobDayTime
  • MyCompany
The correct names and times will replace these placeholders when the email is actually sent.

Use the 'Insert Placeholder' pulldown, as shown below, to insert the placeholders in your email.  If you enter a placeholder by typing it in, don't forget to surround it with the pair of percent characters, like %%MyName%%.


Make sure you give the email a suitable Subject - in this example, we gave it the subject 'On My Way'.  When used in the future as a template, you will use the Subject to identify it.

When the email is just the way you want it, click the 'Add To Templates' button.  Now the email will be reusable for future emails sent for any Customer, Lead or Worker that is sent from the WorkWell Command Center or Mobile App.


To reuse the email, click on 'Choose Template' button.  The Email Template list will pop up, as shown below.  Scroll to find the template you want and click on the check icon to choose it.


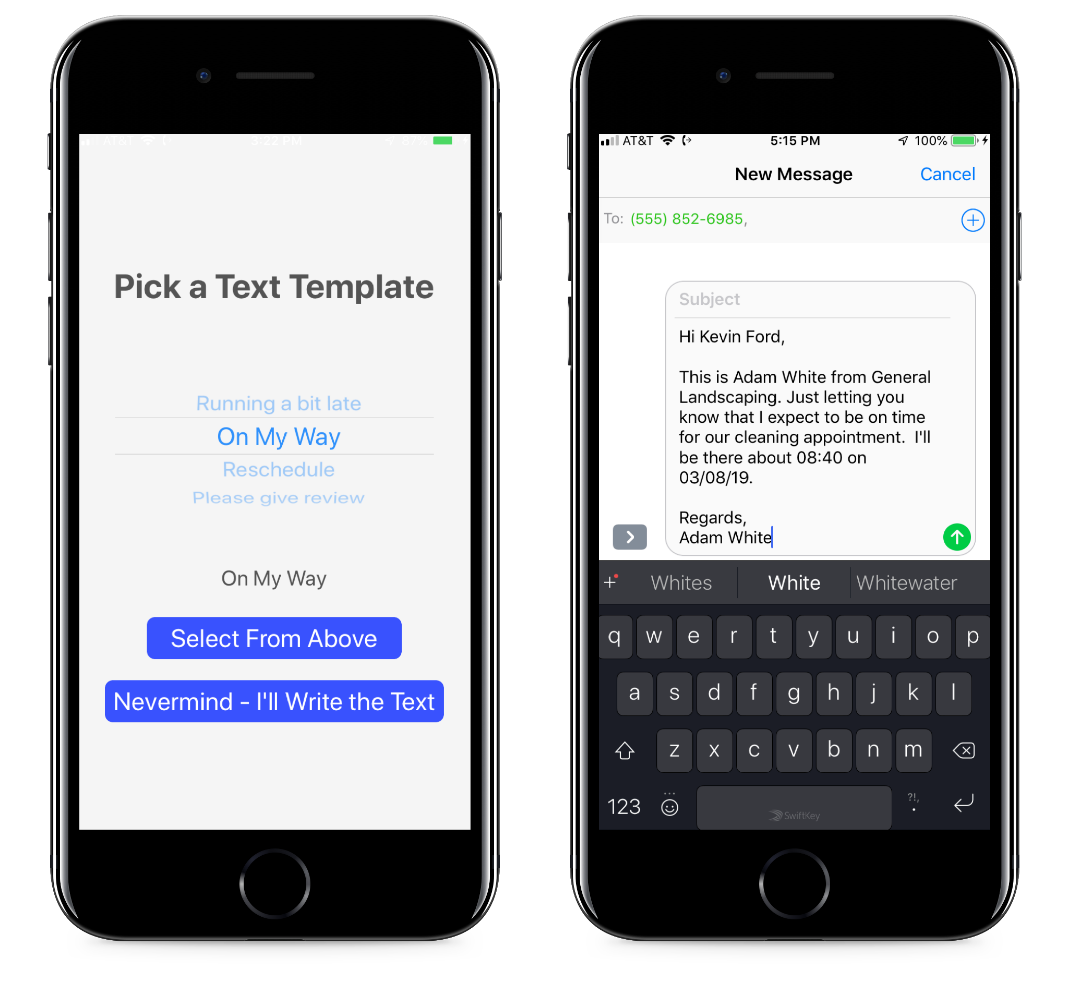
If you are using the Mobile App, then you select the template like shown below:


Making a Text Template

Text Templates are created the same way as Email Templates.  When you write a text, the Text Composer allows you to save the Text as a Template.


Sending Customer Reminders while you are in the Field


When you are on the road or at the job site, wouldn't you love to keep your customer updated without taking much time or effort?  Your customers would certainly appreciate it and you may find that updating customers is the easiest way to earn great reviews!

Many service professionals are in the habit of sending Reminder and On-My-Way messages to let the customer know that you haven't forgotten them and that you expect to be on time.  If you are running late, nothing helps more than to inform your customer that you will not be on time and let them know how late you expect to be.  Customers understand that you cannot always predict with 100% accuracy how long the jobs you have scheduled before theirs will take.  Customers understand that things come up that you cannot always foresee.  But customers may not forgive you being late without informing them.  It is very aggravating to be waiting around for a service professional to show up at your home or business and find that they are an hour late.  At least if you inform them, they can attend to other business.

With the WorkWell Mobile App, it is quick and easy to keep your customer informed.

Open the Job

On the Mobile App, open the job.  Either go to the job list and tap on the next job or go to the Schedule and tap on the job.  The Detailed Job view will open.


Choose an Email and Send

From the Detailed Job view, tap on the Email icon.


The Email Template chooser will appear.  From this, scroll to the Email Template you want and then tap on 'Select From Above'.  You can instead write the email yourself - tap on 'Nevermind ...' and a text entry widget will appear for you to write an email.  The email will then appear for you, ready to send.  Review it and tap on 'Send'.

Email Template Chooser and Resulting Email


Choose a Text and Send

The procedure is the same for sending texts.  Scroll down in the Detailed Job view to the Text item.  Tap on the Text icon.


The Text Template chooser will appear.  From this, scroll to the Text Template you want and then tap on 'Select From Above'.  You can instead write the text yourself - tap on 'Nevermind ...' and a text entry widget will appear for you to write a text.  The text will then appear for you, ready to send.  Review it and tap on the send icon - for the iPhone, it is the green up arrow.


Create Your Email & Text Templates


Thursday, June 20, 2019

Employee Privileges

If you are the administrator, you have privileges for all the Command Center and Mobile App features and you are responsible for setting the privileges for your company's employees.
  
To assign privileges for an employee, you must be your organization's WorkWell Software administrator.  In the Command Center (you cannot do this in the Mobile App), open 'User Management' under the 'Admin' pull-down menu in the Navigation Bar at top.  Select the employee from the User List.

User Table

The Privileges Table, as shown below, is part of the User Edit form that pops up.

Privileges Setup


Command Center and or Mobile App Access

First, check the 'Command Center' and/or 'Mobile App' buttons to allow your user to access either the Command Center or the Mobile App or both.  For example, you might allow an employee who works only in the field to access the Mobile App and not allow any access to the Command Center.  Conversely, an office employee will need access to the Command Center but might not require Mobile App access.

View, Add, Modify, Delete Privileges

Next, you will need to assign your employee specific privileges to access the several types of information.  You can separately grant access to Customer, Lead, Job, Quote, Expense, Service and Chart information.  Further, for each type of information, you can assign privileges to be able to just View the information, Add new information, Modify existing information and Delete information.  

For example, you might allow View privileges to Customer, Job, Services and Quote information.  Add and Modify privileges to Job and Quote information.  But not allow Delete privileges for any information.  This would accomplish the following:
  1. It allows the employee to create new jobs and view existing jobs.
  2. The employee is able to access Customer information but cannot change any existing Customer information.  The employee could not Add new employees - this could be a problem if the employee needs to create a new Job for a customer that isn't already in the system.
  3. Prevents all access to your Lead and Expense Database.
  4. It allows the employee to use the Services information to create new jobs, but prevents the employee from making any changes to the Services Information.
  5. Prevents the employee from seeing how the company is doing via the Charts.
The 'All' column enables you to further restrict access - currently only for Job information.  If 'All' is checked in the Job row, then the selected View/Add/Modify/Delete privileges apply to all jobs.  If not checked, then they apply only to jobs that the employee is responsible for (the employee is assigned within the job as an assigned worker).  This enables you to restrict an employee from seeing the jobs that other employees have been assigned.

Opening Job, Customer, Lead, Quote, Expense forms


Opening A Record - Job, Customer, Lead, Quote or Expense


A Customer Form


View our Customer Management Form Video on YouTube
View our Job Management Form Video on YouTube

The WorkWell Command Center has many ways to get to your detailed Customer, Job, Lead, Quote, Invoice, Expense, and other information.  This article lists the most common ways.

From a Tabular View

All of the Tabular Views provide a detailed description of the information they contain - each row describes a single record.  For example, each row in the Customer Table describes a customer.  To bring up the detailed edit form, just click on the number in the ID column OR select 'Edit' from the pull-down menu in the 'Options' column.

Options Menu in a Tabular View


View our Add, Modify, Delete Records Via Tabular Views Video on YouTube

From the Scheduler

Open the Scheduler page and go to the week, day or month of interest to you.  If you double click on a job event, that Job's Edit form will pop up.

Open a Job from the Scheduler


View our Scheduler Video on YouTube
View our Scheduler Overview on YouTube

From a Timeline View

Timeline Views are accessible on the Dashboard and the Job, Customer and Lead Tabular Views.  The most powerful version is on the Dashboard.  With this Timeline, you can access your overall agenda, or just jobs, customers, leads, quotes, invoices, or expenses.

Timeline View
View our Timeline View Video on YouTube

To open an information edit form, just click on the link in the first row of an event.  For example in the illustration below, click on "Job#8" text and the edit form for Job #8 will pop up.

A Timeline Event


Global Search

Navigation Bar


To open the Global Search tool, click on the magnifying glass icon in the vertical navigation bar to open the Global Search Tool.


Global Search Tool


The Global Search Tool will appear as a popup.  Enter a search term that you expect will locate the Job, Customer, Lead, or other information that you are interested in.  Then, click on the best match among the search results that are provided. The form for that information will then pop up.

From the TimeTable

The Today (and Tomorrow) TimeTable, available on the Dashboard, provides another way to access your detailed information forms.

Today's TimeTable

To open an edit form from the TimeTable ...
  • Click on the number within the ID column of a row describing a job, and the Job Edit form will pop up.
  • If you click on a customer name, the Customer Edit form will pop up.
  • Click on the number within the ID column of a Customer or Lead Action Item and that customer or lead Edit form will pop up. 
  • Click on the ID of a Followup and the related Job, Customer or Lead Edit form will pop up.

The Today and Tomorrow TimeTables are the easiest way to learn about the Jobs and Tasks that are most immediate and a great way to plan your day.

The TimeTable is presented in the Job Management on the Dashboard Video

From an Urgent Activity, ToDo or Recent Activity List

From any of the lists on the lower right of the Dashboard, you can open the related information form.  For example, in the Unpaid Jobs list, just click on any of the jobs in the list to open that job's edit form.


You can do the same for any of the other lists.  For example, open the 'Pending Quotes' list and click on any of the Quote summaries to open that quote's edit form.


Saturday, June 15, 2019

Are there resources to help me learn to use the WorkWell Command Center and Mobile App?


Built-in Help Resources

The Workwell Command Center has several built-in tools to help you to learn to become proficient and to answer any questions that might arise.

View the following Video Tutorial:  Help Resources

Help is available in several ways:

  • Per Page Tour
  • Question & Answer Tool
  • Video Tutorials
  • FAQs
  • Blogs
  • Visit the WorkWell website
  • Email requests


The Tour

Each of the main pages of the Command Center provides a tour to acquaint you with the main features of that page.  To activate a Tour, click on the 'EyeGlasses' icon near the top of the page.  For example, on the Scheduler page, this icon is in the upper right as shown.

Start a Tour - On the Scheduler

The tour will begin - a popup appears pointing to a feature of on the Scheduler page and provides a brief overview.  In the example shown, it describes how to highlight the events on the Schedule according to a variety of criteria.  You advance through the tour by clicking the 'Next' and 'Back' buttons on the Tour popup.  Click the 'Exit' button to end the Tour.  


A Step from the Scheduler Tour

There is also a Tour that is common to every page.  This Tour describes how to get around the Command Center.  To activate this Tour, click on the 'Tour' icon in the upper right.
Command Center - Navigation Bar Buttons
The picture below shows a step in this Tour.  Here, the Tour popup points to a calendar icon and describes that it activates the Scheduler page and what you can do with it.  If you click 'Next', it will move to the Customer icon and describe how to go to the Customer page and describe what you will find.

Tour Popup Example


Q & A Tool

Click the 'QuickLinks' tab at the top to show a collection of links for Tips, Suggestions, and commonly used features.

Quick Links - Tips and Links to Common Features

Videos

Many video tutorials are available.  Go to the Video page by selecting 'Video Tutorials' from the 'Admin' pull-down menu in the navigation bar at the top.  This will bring you to the video selection page.  Videos are organized into topics (playlists).

Video Dashboard

Below we see the Video playlist for Scheduling.  There are 4 videos about this topic.

Playlist for Videos about Scheduling

Click on the video you want to watch.  The selected video will appear like shown below.

Video Player


FAQs

To access the Frequently Asked Questions page, visit www.workwellsoftware.com/faqs on the WorkWell website.

Blogs

To access the WorkWell Blog, visit www.workwellsoftware.com/blog on the WorkWell website.

WorkWell Website

www.workwellsoftware.com
The pages for Dashboard, Scheduling, Job Management, Customer Management, Route Planning, Quote Management, Charts offer a lot of content that can help you to better understand how the Command Center operates.

Email Requests

Finally, if you do not find an acceptable answer to your question from any of the built-in resources, you can always email your question to WorkWell.  

Email your question to workwellsoftware@gmail.com.  You will generally receive a response within a day, if not almost immediately.  We will call you if you wish.