Featured Post

Recurring Jobs

Recurring jobs are sequences of jobs automatically generated according to a schedule that you set up. The schedule can define days of the...

Popular Posts

Monday, August 26, 2019

Tracking Worker Earnings


The WorkWell Command Center tracks your worker earnings for you - automatically.  Additionally, it enables you to easily create per-employee pay plans based on Hourly Earnings, Commission or Fixed pay per job.  OR, any combination of the 3.  What's more, you can modify an employee's pay plan for any given job.

For your hourly employees, WorkWell tracks their work time and calculates their wages over any period you want.  Wages can be broken down per job too, giving you a detailed accounting of all the work they have done - and all the wages they are due.

You can set up pay plans that incentivize your workers with commissions and upsell bonuses.  Offer your lead workers a stake in your business by paying commissions - a percentage of the jobs they do.  And, offer everyone fixed or commission bonuses for additional unplanned services that they sell customers while at the job.  You easily enter and track this information via the WorkWell Command Center, rendering a complex weekly chore into a simple 5-minute task.


Earnings Report

It is easy to determine what you owe your workers over any time period.  When you need to, you can also find all the details you need to track down what work each has done and when and also determine how productive they have been.

Open the Staff Management Table to see employee earnings.  To open this table, choose 'Staff' from the 'Admin' pulldown menu in the navigation header at the top.

Staff Management Table

Bring your attention to the 'Earnings', 'HoursWorked' and 'Jobs' columns.  The information is calculated over the period you have selected via the 'Earnings Period' selector at the top and considers only jobs with the status you have selected via the 'Earnings Job Status' selector.  In the example shown here, these columns reflect earnings for all paid jobs completed this week.

Employee Earnings Columns

In the 'Jobs' column, the green badges show how many jobs the employee worked on.  If you click on a badge, the Job Management Table will appear with jobs the employee has worked on.  This provides detailed information about the jobs, enabling you to research in detail that employee's compensation.

Below is the Selector that appears when you click the 'Earnings Period' button.  Choose among the preset date periods or choose 'Custom Period' if a preset date doesn't meet your needs.

Earnings Period Selector


If you choose 'Custom Period', the Start/End Date Selector shown below appears.  Click in the Start input box and a date selector will pop up from which you select a Start Date.  Likewise, click in the End input box to enter the End Date.


Custom Period Selector
Normally only jobs that have been completed and are Paid are included in the wage calculations.  You can choose to include all jobs that have been Invoiced and are finished but not necessarily paid yet (click on 'Invoiced') or all Finished Jobs that are not necessarily invoiced or paid yet.  Make your selection via the Job Status Selector that appears, as shown below, when you click the "Earnings Job Status" button.

Job Status Selector

Earnings Charts

Worker earnings are sometimes best viewed as charts.  To view the charts, click the 'Charts' button and charts will slide up from the beneath the Staff Management Table.  You may select among a few chart types.
Shown below is a Bar Chart of an employee's earnings, month-by-month, over the last year.  Select the employee whose earnings you wish to review.

Earnings of Individual Worker

You may choose any employee or choose all the employees as shown below.

All Worker Earnings
An Area Chart view, as shown below, shows all your employee earnings together on the same chart.

All Worker Earnings as an Area Chart


How are Earnings Calculated

For each job a worker is assigned, three parameters come into play for determining that worker's earnings.
  • Hourly Pay Rate.  
  • Commission Percentage
  • Fixed Amount for the Job
The Hourly Rate and Commission are shown in the Staff Table and can be modified in the Employee Form.  These are default values for determining employee wages.  When you create a new Job, these values will appear on the Job Form.  If an employee always has the same Hourly Rate and Commission, then simply use the default values on the Job Form and you don't have to do anything.  But if they differ for a particular job, you can change the rate and/or commission on the Job Form.

An Employee Form is shown below, with entries for the Hourly Pay Rate and Commission for that employee.

Employee Form - with Pay Setup

These 2 entries from the Employee Form are shown below.  They are part of your Employee setup and normally don't change until you give the employee a raise or change their role.
Pay Setup Options - Hourly Rate and Commission

As mentioned, when you create a job you can optionally enter different hourly, commission and/or fixed wage parameters.  These are located in the Worker Selection portion of the Job Form as shown below.


Notice that you can change any of these values for any of the employees assigned to the job - just click on the pencil icon next to any value.  Typically you would probably just accept the default values that are automatically assigned.  The worker's pay for the job is given in the 'Wage' column and is based on the duration of the job and the 'Hourly', 'Commission' and 'Fixed' columns.


For jobs consisting of multiple services, worker pay is also broken down for each line item.  In the Line Item Table shown below, the Labor Cost column enumerates the wages per service sold.

Line Items for a Job - Labor Cost is Broken Down per Line Item

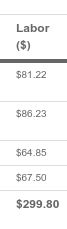
Line Item Table - Labor Cost Column

The Line Item Table's Labor Cost column is shown at left.  It provides a per-line-item breakdown of the wages calculated for the job.  This example shows that $299.80 is owed in wages to the 3 employees assigned to the job.  This is further broken down across the 4 line-items - the line-item duration and pre-tax price are used to determine the wage earned for the line-item.  This level of detail is essential when you are interested in the profitability of each service (the line-items) you sell.

Monday, July 8, 2019

Scheduling a new job

Schedule a New Job

So a customer calls and wants you to stop by next week, either Wednesday or Friday, to clean the carpets in her home.  How do you schedule her?

You can schedule from the WorkWell Command Center if you are on your computer or with the Mobile App if you are in the field.  The Command Center offers the most capability and we recommend you do most of your scheduling there.  But it is easy to add new jobs from the Mobile App too. 

Employees must be authorized with the appropriate privileges to create new jobs.  Setting Employee Privileges

Scheduling from the Command Center

View our Scheduling Video on YouTube.

The most direct way to create/schedule a job is to just open the 'New Job' form and fill out all the information.  How to open a 'New Job' form

New Job Form
New Job Form

In the 'When' box, choose the start date and time.  The end date and time will be set automatically from the services you select as line items (the services you have set up will have a default duration that you assign).  You can click 'Override' to set the end date and time yourself.
Job Start and End Date/Time
Job Start/End
But normally, you need to see when and where all your other jobs are already scheduled and who is responsible for these jobs.  Normally, you want to use the Scheduler.  Select 'Jobs' and Highlight by 'Workers'.  This will show all the jobs, color-coded by which worker is responsible for doing them.  Choose an available time on the day you would like to do the job - assign the job to an available worker.  Make sure jobs of the same color do not overlap - after all, a worker cannot be in two places at the same time.

Job Schedule
Schedule for This Week - Color-Coded by Worker
To create the job, double click on the calendar in the desired timeslot.  The 'New Job' form will pop up and allow you to enter the job information - like which customer, the worker(s) you are assigning to do the job, the line items describing the work, etc.

Of course, you also want to include job locations in your scheduling decisions.  Ideally, you schedule jobs and assign to available workers based on when a worker is already in the general area that the new job is located in.  For this, just open the Map page and take a look at where all the already scheduled jobs are located.  Under selection criteria, select a timeframe that covers the days you are considering for the new job - choose 'This Week', for example.  Also, choose the workers you want to colorize for.  The markers that appear will show you where the jobs are located and will be colored by worker.  The table below the map will give you the job details.  With this map view, you will be able to see if and when a worker is in the same town as the new job.

Location of Jobs This Week
Job Locations - Color-Coded by Worker

Scheduling from the Mobile App

On the Mobile App, you can view your schedule in a Month or Day view like shown.
Mobile App Calendar - Month & Day Views

When you decide the Date & Time for the new job, go to the Job List view and click the + icon in the upper right.

Job List - Click Plus Icon to Add New Job

The New Job form will appear - choose the customer, select the job start date, time and duration.  Choose the services under Line items.  Etc.

New Job Form - Describe the Job

Today's TimeTable


The Command Center Dashboard

The Command Center Dashboard contains a grouping of Today's Activity widgets (and another of Tomorrow's Activity widgets).  This gives you a very quick and easy way to see the most immediate and important things that need to be done at the start of your day.  The idea is to consult the 'Today' widget in the morning to help prepare for the day ahead.  There is also a 'Tomorrow' widget that is handy for you to consult at the end of the day, to help prepare you for the day to come.

The following snapshot illustrates the collection of Today's Activity widgets.


Today's Activity

The Today Activity Widgets

There are 6 widgets, 4 tools, and 2 status indicators.

Status Indicators

The status indicators have a label, a green circular badge, and a next icon.  The following is an example of the 'Jobs' indicator.
An Example Today's Activity Job Status Indicator

It provides a quick status about the jobs scheduled for Today.  This one shows there are 9 jobs, with expected revenue of $3,890.61.  Click on the next icon to see additional status - the total hours of work booked for the day and a breakdown of hours booked per worker.

The 'Reminders' indicator is illustrated below.  This one shows that there are 5 reminders due today.  One of the Reminders is a Customer Action Item.  Click on the next icon to see how many of the other types of reminders are due today.
An Example Today's Reminder Status Indicator


Tools

To open any of the 4 tools ...

  • Click on the 'TimeTable' link to bring up Today's TimeTable.  More below ...
  • Click on the 'Schedule' link to bring up the Scheduler with today's jobs shown.   Here is a Scheduling Video that describes how to use the Command Center Scheduling View.
  • Click on the 'Details' link to bring up the Job Management Table view.  Here is a Job Management Tabular View Video that describes how to use the Job Tabular view.
  • Click on the 'Route' link to bring up a map view that includes optimized travel directions between the jobs.  Here is a Map and Route Planning Video that describes the mapping tools.

Today's TimeTable

Today's TimeTable has 2 tables.  The first gives the details of today's Jobs, the second the details of today's Reminders.

View our Video Tutorial about Today's TimeTable on YouTube.

Today's TimeTable


Today's Jobs

Each row of the Job TimeTable describes a job scheduled for today.  The following information appears for each job.
  • ID of the Job - Use this to find the job elsewhere, like the Job Management Table
  • Who is the customer?  Click on the Customer name if you want to make any changes to the customer information or view more detail about that customer.
  • What services are to be done at the job.  A list of the job's line items.
  • When is the job scheduled to be done - start and end time.
  • Where is the job located - customer address.  Click on the address to bring up a map.
  • Worker(s) responsible for doing the job
  • Amount you are charging the customer
  • Supplies that are needed for the job
  • Phone number of the customer
  • Email address of the customer.  Click on the email address to access the Email Compose and send the customer an email.
Your workers can access this information themselves while in the field by using the WorkWell Mobile App.  But you can also text your workers the TimeTable - click on the text icon at the top.

If you need to modify a job, just click on the job ID.  This will bring up the Job Edit form, allowing you to make any changes you need to make and see additional detail about the job.

Text Job Assignments to your Workers

Click on the 'Text to Workers' button in the TimeTable header to send today's job assignments to your workers.

Text to Worker Button

You will be prompted to select a worker from a list of all the workers on duty today.  Select one and the Text Composer will appear as shown below.  The text will be automatically prepared with 'To', 'From', 'Subject' and 'Message' completed.  You can edit the text if you wish.  Click 'Send' and today's assignment will be texted to the worker you selected.

Automatically Prepared Text of Worker Assignment


Today's Reminders

Reminders consist of any Action Items and/or Followups that are due today.

Each row of the Job TimeTable describes a reminder scheduled for today.  The following information appears for each reminder.
  • ID of the Job - Use this to find the job elsewhere, like the Job Management Table
  • Type of the Reminder.  A reminder could be a Customer, Lead or Job Followup or a Customer or Lead Action Item.
  • Who is the customer?  Click on the Customer name if you want to make any changes to the customer information or view more detail about that customer.
  • When is the reminder scheduled to be done?  Followups are assigned a date.  Action Items are assigned a date and start and end time.
  • Responsible Person identifies the worker responsible for completing the Reminder.  Applies to Action Items only.
  • Category identifies which of the categories you have assigned to the reminder.  Applies to Action Items only.
  • Action is an optional description of what the Reminder is about.  Applies to Action Items only.
Your workers can access this information themselves while in the field by using the WorkWell Mobile App.

If you need to modify a reminder, just click on the reminder ID.  This will bring up the Customer or Lead Edit form that contains the reminder.  You can then make any changes you need to make and see additional detail.

Schedule

Click on the 'Schedule' link to open the Schedule Calendar for Today.

Scheduling Blog Post
View our Scheduling Video on YouTube.

Details

Click on the 'Details' link to open the Job Management Tabular View with Today's Jobs listed.

View our Video Tutorial about the Job Management Tabular View on YouTube.

Route

Click on the Route link to open the Map View of Today's Jobs along with Routing displayed.

View our Video Tutorial about Job Routing on YouTube.


Wednesday, June 26, 2019

Make an Email or Text Template

What is an Email or Text Template?

These are Emails or Texts that you have written for a particular purpose and saved for future use.  Typically you spend a little time on these so they are just as you want them.  For example, you can enter placeholders for the customer name.  You might also have a footer with your company info and logo (for emails, not texts).

View our Video About Email Templates

An example email reminder
An example email list

Making an Email Template

You create your email templates using the WorkWell Command Center email tool.  Templates cannot be created using the Mobile App.

To create your template, open the Email Composer (you can click on an email link - or open a Customer Form or the Customer Table and click on an email link).  This will open the Email Composer.  Then just prepare an email like you normally do.  In the example below, we are writing an email saying simply that we are On Our Way and on time.


Prepare your Template Using the Email Composer

Notice that we have inserted a few Placeholders in the Email (the keywords surrounded by the %% characters, like %%CustomerName%%.  Using these, we make the Email Template very flexible - we don't have to know in advance who the email is intended for, nor do we need to know which worker in your company is sending it or even when it is sent.  This example uses 4 placeholders:

  • CustomerName
  • MyName
  • JobDayTime
  • MyCompany
The correct names and times will replace these placeholders when the email is actually sent.

Use the 'Insert Placeholder' pulldown, as shown below, to insert the placeholders in your email.  If you enter a placeholder by typing it in, don't forget to surround it with the pair of percent characters, like %%MyName%%.


Make sure you give the email a suitable Subject - in this example, we gave it the subject 'On My Way'.  When used in the future as a template, you will use the Subject to identify it.

When the email is just the way you want it, click the 'Add To Templates' button.  Now the email will be reusable for future emails sent for any Customer, Lead or Worker that is sent from the WorkWell Command Center or Mobile App.


To reuse the email, click on 'Choose Template' button.  The Email Template list will pop up, as shown below.  Scroll to find the template you want and click on the check icon to choose it.


If you are using the Mobile App, then you select the template like shown below:


Making a Text Template

Text Templates are created the same way as Email Templates.  When you write a text, the Text Composer allows you to save the Text as a Template.


Sending Customer Reminders while you are in the Field


When you are on the road or at the job site, wouldn't you love to keep your customer updated without taking much time or effort?  Your customers would certainly appreciate it and you may find that updating customers is the easiest way to earn great reviews!

Many service professionals are in the habit of sending Reminder and On-My-Way messages to let the customer know that you haven't forgotten them and that you expect to be on time.  If you are running late, nothing helps more than to inform your customer that you will not be on time and let them know how late you expect to be.  Customers understand that you cannot always predict with 100% accuracy how long the jobs you have scheduled before theirs will take.  Customers understand that things come up that you cannot always foresee.  But customers may not forgive you being late without informing them.  It is very aggravating to be waiting around for a service professional to show up at your home or business and find that they are an hour late.  At least if you inform them, they can attend to other business.

With the WorkWell Mobile App, it is quick and easy to keep your customer informed.

Open the Job

On the Mobile App, open the job.  Either go to the job list and tap on the next job or go to the Schedule and tap on the job.  The Detailed Job view will open.


Choose an Email and Send

From the Detailed Job view, tap on the Email icon.


The Email Template chooser will appear.  From this, scroll to the Email Template you want and then tap on 'Select From Above'.  You can instead write the email yourself - tap on 'Nevermind ...' and a text entry widget will appear for you to write an email.  The email will then appear for you, ready to send.  Review it and tap on 'Send'.

Email Template Chooser and Resulting Email


Choose a Text and Send

The procedure is the same for sending texts.  Scroll down in the Detailed Job view to the Text item.  Tap on the Text icon.


The Text Template chooser will appear.  From this, scroll to the Text Template you want and then tap on 'Select From Above'.  You can instead write the text yourself - tap on 'Nevermind ...' and a text entry widget will appear for you to write a text.  The text will then appear for you, ready to send.  Review it and tap on the send icon - for the iPhone, it is the green up arrow.


Create Your Email & Text Templates